Docker is awesome. I was late to the party and didn’t get hands-on until last year. But Docker has quickly become one of the favorite tools. It enables software developers to package, ship and run their applications anywhere without having to worry about setup or dependencies. Combined with Kubernetes, it becomes even more powerful for streamling cluster deployments and management. I digress. Back to Docker. Docker is loved by software developers and its adoption rate has been remarkable.
So what exactly is Docker?
It’s a platform for building, testing, deploying and publishing containerized applications. I say platform because Docker is a set of tools for managing all-things related to containers. Containers are at the heart of Docker so that’s what we’re going to explore in depth next.
What is a Container?
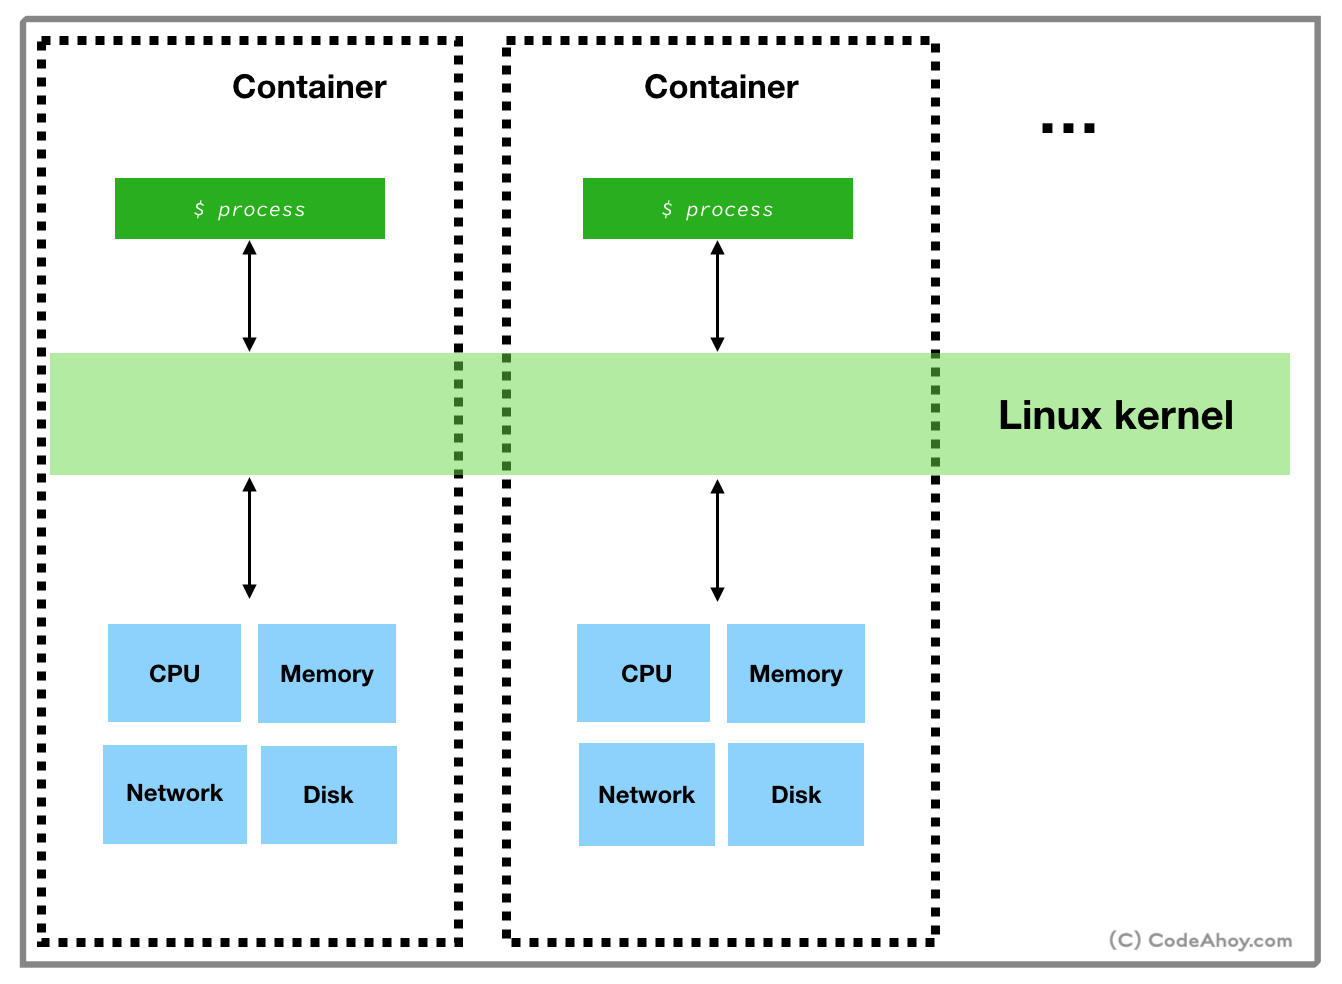
Containers provide a way to install and run your applications in isolated environments on a machine. Applications running inside a container are limited to resources (CPU, memory, disk, process space, users, networking, volumes) allocated for that container. Their visibility is limited container’s resources and can’t conflict with other containers. You can think of containers as isolated sandboxes on a single machine for applications to run in.This might sound familiar. The concept is similar to virtual machines. But there’s a a key difference: containers use a very different, light-weight technique to achieve resource isolation. The technique used by containers exploits features of the underlying Linux kernel as opposed to hypervisor based approach taken by virtual machines. In other words, containers call Linux commands to allocate and isolate a set of resources and then runs your application in this space. Let’s take a quick look at two such features:
1. Namespaces
I’m over simplifying but Linux namespaces basically allow users to isolate resources like CPU, between independent processes. A process’ access and visibility are limited to its namespace. So users can run processes in one namespace without ever having to worry about conflicting with processes running inside another namespace. Processes can even have the same PID on the same machine within different containers. Likewise, applications in two different containers can use port same ports (e.g. port 80).2. cgroups
croups allow putting limits and constraints on available resources. For example, you can create a namespace and limit available memory for processes inside it to 1 GB on a machine that has say 16 GB of memory available.By now, you’ve probably guessed how Docker works. Behind the scenes, when you ask Docker to run a container, it sets up a resource isolated environment on your machine. Then it copies over your packaged application and associated files to the filesystem inside the namespace. At this point, the environment setup is complete. Docker then executes the command that you specified and hands over the control.
In short, Docker orchestrates by setting up containers using Linux’s namespace and cgroups (and few other) commands, copying your application files to disk allocated for the container and then running the startup command. It also comes with a bunch of other tools for managing containers like the ability to list running containers, stopping containers, publishing container images, and many others.
Compared to virtual machines, containers are light weight and faster because they make use of the underlying Linux OS to run natively. However, namespace and cgroups features are only available on Linux, therefore containers can not run on other operating systems. At this point you might wonder how Docker runs on macOS or Windows? Docker actually uses a little trick and installs a Linux virtual machines on non-Linux operating systems. It then runs containers inside the virtual machine.
Let’s put everything that we have learned so far and create and run a Docker container from scratch. If you don’t already have Docker installed on your machine, head over here to install. In our super made up example, we’ll create a Docker container, download a web server written in C, compile it, run it and then connect to the web server from our web browser (in other words, from host machine that’s running the container.)
We’l start where all Docker projects start. By creating a file called
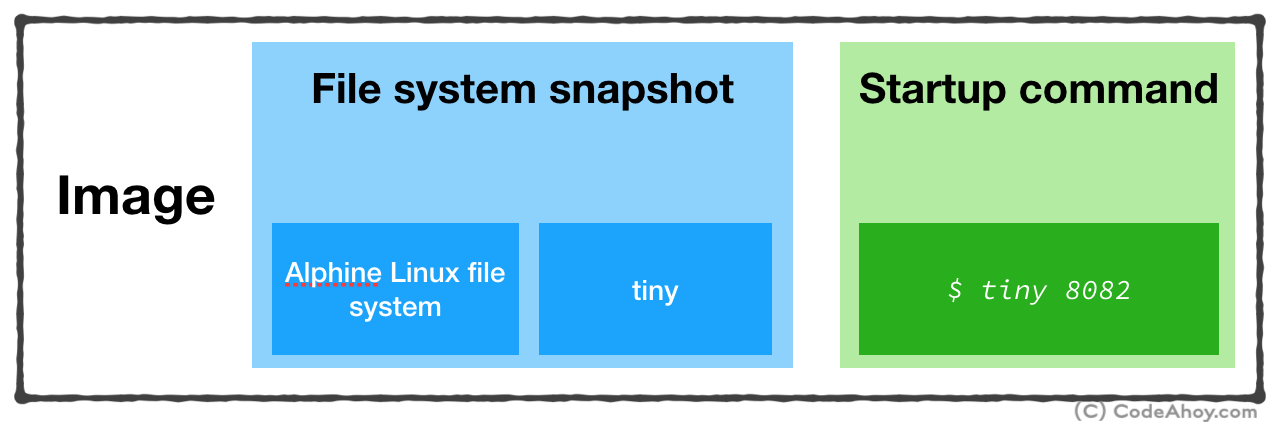
Dockerfile. This file contains instructions that tell Docker how to create a docker image that’s used for creating and running containers. Since, we didn’t discuss images, let’s take a look at the official definition:An image is an executable package that includes everything needed to run an application–the code, a runtime, libraries, environment variables, and configuration files. A container is a runtime instance of an imagePut simply, when you ask Docker to run a container, you must give it an image which contains:
- File system snapshot containing your application and all of its dependencies.
- A startup command to run when the container is launched.
Dockerfile so we can build an image. It’s extremely common in the Docker world to create images based on other images. For example, the official reds Docker image is based on ‘Debian’ file system snapshot (rootfs tarball), and installs on configures Redis on top of it.In our example, we’ll base our image on Alpine Linux. When you see the term alpine in Docker, it usually means a stripped down, bare-essentials image. Alpine Linux image is about 5 MB in size!
Alright. Create a new folder (e.g.
dockerprj) on your computer and then create a file called Dockerfile.umermansoor:dockerprj$ touch Dockerfile
Dockerfile.# Use Alpine Linux rootfs tarball to base our image on
FROM alpine:3.9
# Set the working directory to be '/home'
WORKDIR '/home'
# Setup our application on container's file system
RUN wget http://www.cs.cmu.edu/afs/cs/academic/class/15213-s00/www/class28/tiny.c \
&& apk add build-base \
&& gcc tiny.c -o tiny \
&& echo 'Hello World' >> index.html
# Start the web server. This is container's entry point
CMD ["./tiny", "8082"]
# Expose port 8082
EXPOSE 8082
Dockerfile above contains instructions for Docker to create an image. Essentially, we base our image on Alpine Linux (rootfs tarball) and set our working directory to be /home. Next, we downloaded, compiled and created an executable of a simple web server written in C. After, that we specify the command to be executed when container is run and expose container’s port 8082 to the host machine.Now, let’s create the image. Running
docker build in the same directory where you created Dockerfile should do the trick.umermansoor:dockerprj$ docker build -t codeahoydocker .
Successfully tagged codeahoydocker:latest
- Filesystem snapshot (Alpine Linux and the web server we installed)
- Startup command (
./tiny 8092)
Now that we’ve created the image, we can build and run a container from this image. To do so, run the following command:
umermansoor:dockerprj$ docker run -p 8082:8082 codeahoydocker:latest
With
docker run, we asked Docker to create and start a container from the codeahoydocker:latest image. -p 8082:8082 maps port 8082 of our local machine to port 8082 inside the container. (Remember, our web server inside the container is listening for connections on port 8082.) You’ll not see any output after this command which is totally fine. Switch to your web browser and navigate to localhost:8082/index.html. You should see Hello World message. (Instructions on how to delete the image and container to clean up will be in comments.)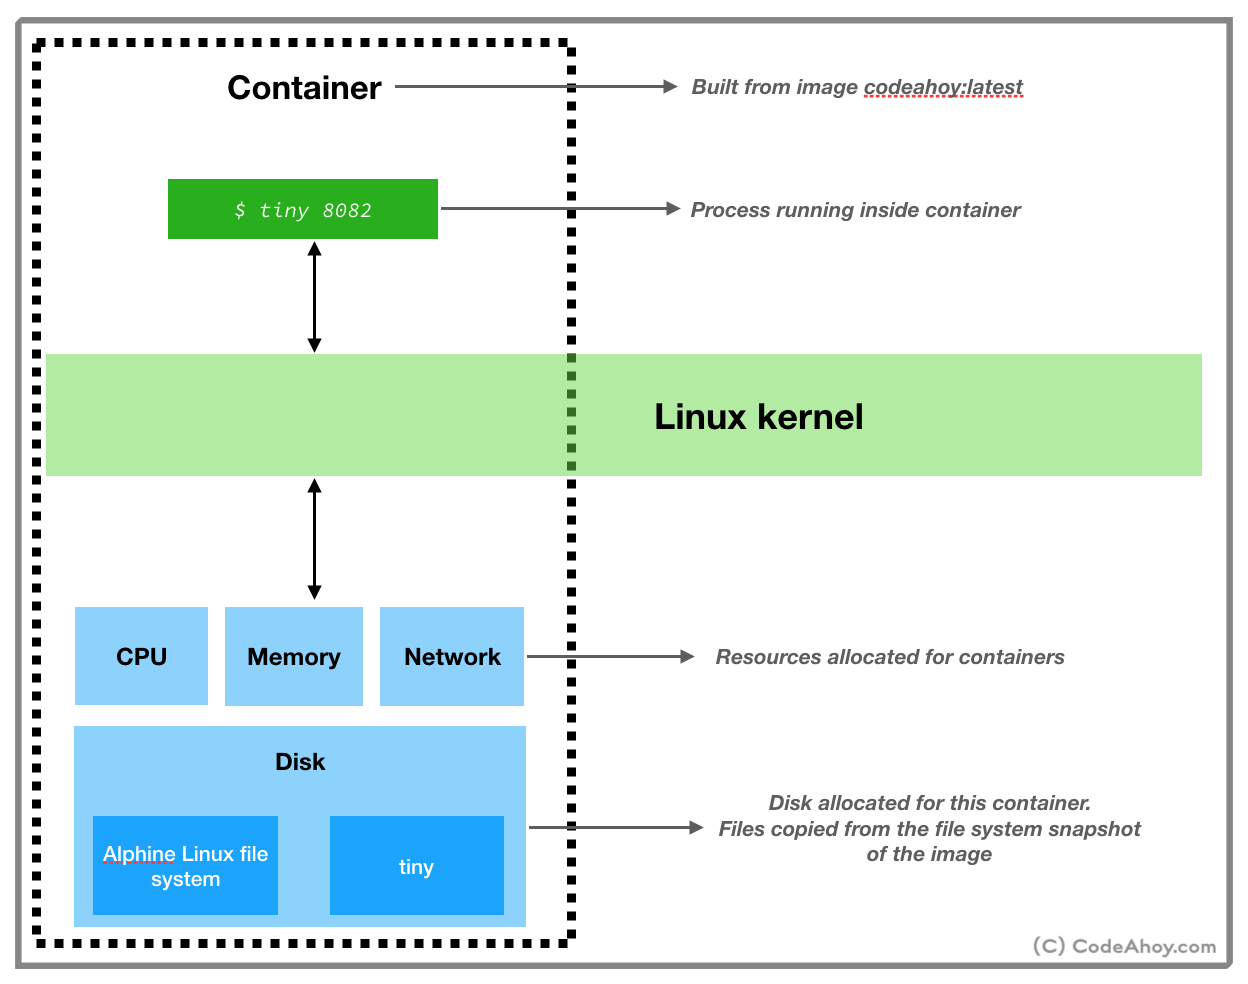
Hope this was helpful. Until next time.